
Imagine stepping onto a flawlessly smooth, visually stunning surface that transforms your space instantly—an achievable dream with proper laminate flooring installation.
How to stagger laminate flooring isn’t just about aesthetic appeal; it’s about crafting a durable, long-lasting foundation that elevates every room’s ambience.
In this article, you’ll dive deep into the nuances of floor layout patterns and why mastering the staggering process is crucial for avoiding common pitfalls such as plank misalignment and unsightly gaps.
Staggering laminate effectively requires understanding the intricate balance between plank width variations, expansion gaps, and consistent joint placement.
You’ll gain insights into:
- Essential tools for the job and how to use them efficiently.
- Step-by-step guidance on subfloor preparation to sequential plank installation.
- Tips for achieving the perfect stagger, enhancing both the durability and visual appeal of your flooring.
Whether you’re tackling this as a DIY project or planning to guide your installation team, mastering these techniques will ensure a floor that is not only beautiful but stands the test of time.
How to stagger laminate flooring
To properly stagger laminate flooring, follow these steps:
- Stagger the end joints of the planks by at least 6-12 inches between rows. This adds stability and prevents gaps from forming.
- For the first row, cut the first plank to at least 18 inches long (1/3 of the plank length). Use the cut-off piece to start the second row.
- For subsequent rows, start each row with a plank that is offset from the previous row by at least 12 inches. This prevents any seams from aligning vertically.
- If needed, cut planks to length to maintain the stagger pattern and prevent any seams from aligning.
- Plan the layout so the laminate runs lengthwise in long spaces like hallways for a better appearance.
- Check the manufacturer’s instructions for the specific stagger requirements, as they may vary slightly.
Advantages of laminate flooring
There is a good reason why laminate flooring is the choice of many people. There is a long list of features and traits of laminate flooring. It is practical and decorative at the same time. We believe you already know some of the good traits of laminate flooring. Here we will present you with some new information that might make you like it even more.
Durability
When reconstructing anything around the house, we all want it to last as long as possible. The durability of the laminate floor is exactly what you look for. It has an aluminum oxide top coating. Thus it is resistant to impacts, scratches, dents, fading and strains.
Laminate flooring exceeded any sort of hardwood, vinyl or carpet with its quality. For this reason, people choose laminate flooring for high-traffic places, homes with pets and children. It is good for your local gym and for your home too.
Price
Laminate flooring is a perfect match of quality and price. It costs less than traditional hardwood, but it doesn’t fall back when it comes to aesthetics.
It can actually give you the same effect as hardwood, and yet cost way less and demand less maintenance. Give less and get more – who wouldn’t like that?
Easy Installation
The best solutions are the ones where we can save both money and time. That is exactly what you get if you choose laminate flooring.
The laminate boards have an interlock mechanism, like a puzzle. The laminate floor can be set above the existing floor. You don’t need any special contractor license or knowledge to install this in your home.
Easy to Clean and Maintain
Laminate flooring is very resistant, so any mess you make can be easily handled. It is very useful for places with a great concentration of people, so it is a good choice for private homes or offices, a gym…
It doesn’t even need any special chemicals to keep it clean and in the best shape. Regular vacuuming and mopping are enough.
Style/Appearance
 Image source: Paul Anater
One of the best features of laminate flooring is the wide range in a choice of style. You can pick from many different colors and patterns and match them with the rest of the room. Whether you want it to be more traditional, warm, and cozy or something more simple, elegant, contemporary… Any design you imagine can be made with the use of special high-definition printers.
Staggering Laminate Flooring
If you decided to install laminate flooring all by yourself, we offer you some useful tips and advice. Follow them and you will end with amazing results.
To start, you will first need some tools:
- Measuring tape
- Carpenter’s square
- Pencil/Marker
- Hammer
- Handsaw
- Circular saw(or table saw, miter saw, jigsaw)
- Thick spacers
- Utility knife
- Safety glasses
- and dust mask
If you have all these, you are ready to start. We will introduce you to the procedure step by step
Procedure
Calculate flooring material
First, you need to write down the measures of a room using the tape measure. You need to know the surface size to know how much material, laminate boards, you need for each room. Laminate planks are usually 3 to 4 feet long. Divide the length of a room with the length of the flooring boards.
Define expansion gaps
Humidity can affect laminate floors to expand and contract to a certain length. This is why it is crucial to determine the expansion gap. You should mark a line or couple of dots at about 3/8 inch away from the walls. Don’t worry – the expansion space will be covered afterward with the wall base after all the boards have been set.
Trim the doorways
Pay special attention to the doorways when installing the laminate flooring. It has to fit perfectly so it would look neat and clean.
Before placing the boards, you have to trim door casings and side jambs. Boards should go underneath it. Use T-moldings if you’re installing laminate floors through the doorways. This should be used to separate the rooms.
Cutting planks

Sometimes you’ll have to cut laminate boards to a certain length to fit them properly. Use lumber or damaged flooring peace to get a spacer plank. You can do the cutting with different tools: circular saw, table saw, power saw, miter saw, jigsaw… To avoid planks chipping too much, use sharp saw blades. You need the planking pieces as spacers to frame the perimeter.
Make sure not to cut the planks near the installation area. This will keep the excessive dust as far as possible from the site. Use protective gloves and glasses to keep safe from any possible injuries.
Subfloor preparation
With good preparation, laminated floors can be laid over many sorts of subfloors. Before the installation, clean the subfloor from any kind of dirt. Dirt might affect the process, subfloor should be neat and clean.
Test the subfloor for any squeaks. Walk around and listen. You can get rid of unpleasant sounds with the use of a cordless drill or a cordless impact driver. Mark the spots where you heard the noise and drive 2-inch drywall screws into those spots.
When it comes to the subfloor flatness, it should be about 1/16 inches per 3 ft. Level the floors before you start the installation. There are special leveling compounds you can use to fill those depressed areas.
If you find any cracks or openings in the subfloor, use wood putty or self-leveling compound to stuff and close them.
If you’re dealing with the concrete floor, the procedure is a bit different and takes more time. You have to leave the concrete to dry entirely before starting the installation. It takes around 60 days.
Installation of planks
First, you need to count how many planks you need to position around the floor, like a frame. Look for any potential damage on each board before installing it.
Start with the longest board you have. Don’t forget about the expansion space and use spacers when installing the first row.
Make sure you calculate the width of the flooring planks for the first and the last row. This will ensure the floor looks well-balanced. More important is to know not a single row should be less than half the width of a single full board.
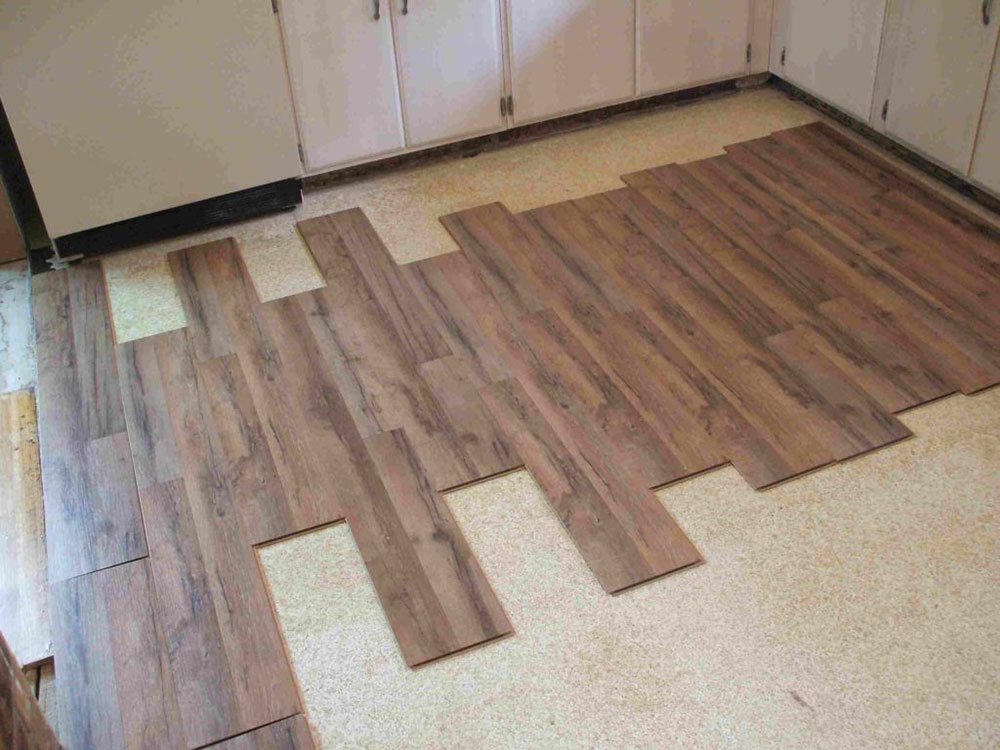
Position the first plank with the long edge facing the wall. Lift the right side of the next plank to about 30 degrees and put its short end tongue into the grove of the previous plank. To lock them together, lower the plank. Repeat this in a similar manner to install the first plank of the second row.
To make sure two planks connected, use pressure. You can use a rubber hammer. You should hear a specific sound when two planks click together. You continue doing this for the next rows as well.
The last row is a bit different and you’ll need a tape measure for this one. If you want it to fit perfectly, cut down the plank tongue lengthwise for the last row. After that, you should be able to place and fit the last piece of the puzzle.
Tips for Staggering Laminate Flooring
Here are some useful extra tips if you decide to do staggering all by yourself.
- Before you start, make a staggering pattern between any two adjacent rows. Many laminate floor manufacturers expect the floors to be staggered in the range of 6 to 12 inches.
- Read the manufacturer’s guidelines before you start working.
- It is good to avoid shorter flooring stagger. This is neither aesthetically attractive nor good. It can lead to some issues later (as if you didn’t do the staggering at all).
- Try to avoid the H-joints. These are usually found on the floors laid in a regular pattern. They are not useful aesthetically or structurally. You may spot an H-joint when the aligned end joints are divided by a sole row of laminate planks.
- To decrease the expansion and contraction, lay the laminate floor in a regular pattern.
Laminate has many great features, but it still has certain limitations. They are resistant to humidity and moisture, but they’re not waterproof.
They might look like real wood, but they are not real wood. You can see the difference by walking across the real wood and laminate floor.
Remember, it is crucial to have a staggering pattern before you start installing. You can lay laminate boards before actually clicking them together to have a preview.
FAQ On How To Stagger Laminate Flooring
Why is staggering necessary in laminate flooring?
Staggering is essential to prevent seam alignment across the floor, which can weaken the structure and disrupt the aesthetic flow. It enhances both durability and visual appeal, ensuring a smoother, more uniform look that imitates real wood or stone flooring.
How much should laminate planks be staggered?
Ideally, stagger laminate planks by at least 8 inches (20 cm). This variation avoids pattern repetition and structural vulnerabilities, crucial in maintaining the flooring’s integrity and visual interest.
Can I stagger laminate without using tools?
While minimal tools are unavoidable, such as a tape measure and a saw for cutting, proper floor layout patterns and staggering do not require complex tools. Simple, DIY flooring projects benefit from precisely measured and cut planks to ensure everything fits snugly.
What happens if laminate flooring is not staggered correctly?
Incorrect staggering can lead to visual and structural issues like peaking, where planks push against each other and rise at the joints. This not only affects the floor’s appearance but also its long-term usability and durability.
Is there a specific pattern to follow when staggering?
While the traditional recommendation is to stagger the seams randomly, ensuring each row offset varies significantly from the next, some prefer an aesthetic orderly pattern using ratios like 1/3 or 1/2 the plank length. Both approaches help optimize structural integrity and appearance.
How do I calculate the amount of laminate needed, considering staggering?
Begin by measuring your room’s square footage and then calculate an additional 10% of the material to account for cuts and waste due to staggering. This extra ensures you won’t run short and can maintain a continuous stagger pattern.
What tools are essential for staggering laminate flooring?
A few key tools include a laminate flooring cutter or saw, a tape measure, spacers, and a rubber mallet. These assist in precise cutting, measuring, and installation, helping maintain an even and proper flooring staggering pattern.
How to deal with doorways when staggering laminate?
When reaching a doorway, measure the planks to finish under the door when it is closed. It ensures that the transition appears seamless. Custom cut the last plank to fit if necessary, maintaining the stagger pattern as you move into the next room.
What is the minimum stagger for laminate flooring?
The minimum stagger typically recommended is 8 inches (20 cm), which helps to ensure that the joints do not align too closely, maintaining the flooring’s structural stability and visual appeal.
Can I reuse laminate planks and still maintain a good stagger?
Yes, you can reuse laminate planks as long as they are in good condition. Carefully disassemble and measure each piece to fit into the new layout, ensuring each is staggered appropriately to maintain strength and enhance the floor’s overall beauty.
Conclusion
Delving into how to stagger laminate flooring reveals more than just laying planks; it’s about crafting a space that echoes style and sustainability. You’ve navigated through the essentials—from selecting the right floating floor techniques and flooring spacers to mastering sequential plank installation. Each step ensures not just an aesthetic win but a practical triumph, ensuring longevity and ease of maintenance.
In embracing these approaches, you have not only equipped yourself with the DIY flooring projects skills but also a deep appreciation for the nuances of laminate installation. Remember, the right stagger pattern isn’t just about following measurements—it’s about vision, creating a flow that complements your space and daily life.
Armed with these insights, you can look forward to a flooring that doesn’t just look great but performs exceptionally well under everyday demands. Here’s to stepping onto a beautifully staggered floor that you’ve expertly laid out—ready to withstand the test of time and trends.