Kitchen HowTos
How to Make a Kitchen Island with IKEA Cabinets

Transform your kitchen workspace without breaking the bank. How to make a kitchen island with IKEA cabinets offers an affordable solution that rivals custom installations costing thousands more.
IKEA’s SEKTION base cabinets provide the perfect foundation for DIY kitchen renovation projects. Their modular design allows endless combinations while maintaining professional quality standards.
Most homeowners think custom islands are their only option for additional kitchen storage solutions.
Actually, smart cabinet combinations create stunning results at a fraction of professional costs.
This comprehensive guide walks you through every step of kitchen island assembly. You’ll learn cabinet selection strategies, essential tools, assembly techniques, and finishing methods that create restaurant-quality results.
We’ll cover everything from base cabinet combinations to countertop installation, plus troubleshooting common issues. By the end, you’ll have the confidence to build a functional centerpiece that transforms your entire kitchen workflow.
Planning new colors as well? Our kitchen color schemes guide sorts cabinet, countertop and hardware pairings by cabinet color.
Selecting IKEA Components and Materials

Base Cabinet Selection Strategy
SEKTION base cabinets form the foundation of your DIY kitchen island project. These modular units come in standard widths from 12 to 36 inches, allowing flexible combinations.
Start with your measurements. Kitchen island dimensions should provide at least 36 inches of clearance on all sides for proper workflow.
The 24-inch depth cabinets work best for most island builds. Wider 30-inch units create more storage but require larger spaces.
Cabinet Series Comparison
SEKTION remains the current IKEA cabinet system. Unlike older series, these feature adjustable legs and consistent hardware mounting.
Look for weight ratings on cabinet specifications. Standard base units support up to 40 pounds per shelf when properly installed.
Corner cabinets add storage but complicate assembly. Save these for experienced builders only.
Hardware and Internal Organization
Drawer slides come in two types: standard and soft-close. Soft-close mechanisms prevent slamming and extend cabinet life.
Interior organizers maximize your kitchen storage solutions. Wire baskets, divider inserts, and pull-out trays transform basic boxes into functional workspace.
Cabinet accessories like toe kicks and decorative panels create finished appearance. These aren’t structural but improve the final look significantly.
Door Styles and Finishes
Cabinet door styles range from flat RÅSDAL panels to raised GRIMSLÖV fronts. Match your existing kitchen design or create deliberate contrast.
White and wood tones offer timeless appeal. Bold colors like navy or sage green make statement pieces.
Handles and knobs affect both function and style. Bar pulls work well for drawers while knobs suit cabinet doors.
Countertop Material Choices
IKEA countertops include laminate KARLBY tops and solid wood HAMMARP surfaces. Both require careful measuring and cutting.
Countertop overhang for seating needs 10-12 inches minimum. Support brackets become necessary beyond 8 inches of overhang.
Third-party materials like quartz or granite require professional templates. Factor installation costs into your budget planning.
Structural Support Elements
Cabinet legs adjust from 4.5 to 6 inches for leveling. Stainless steel versions resist moisture better than plastic alternatives.
Wall attachment points aren’t needed for islands but floor anchoring prevents movement. Heavy countertops add stability naturally.
Consider electrical planning early. Outlets require rough-in before assembly completion.
Tools and Preparation Requirements
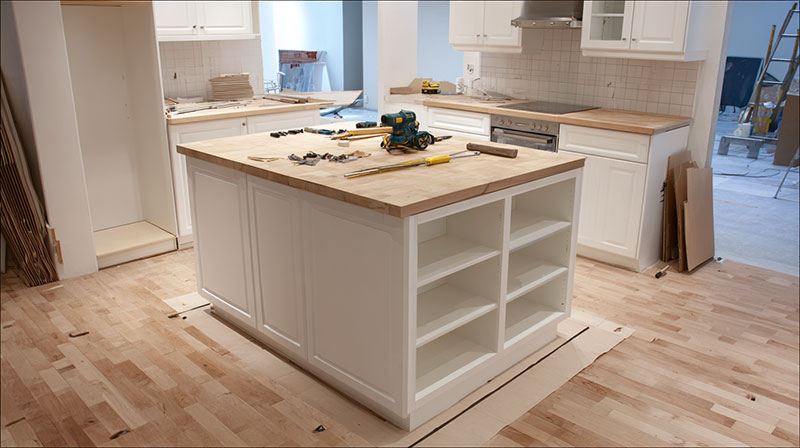
Essential Power Tools
A cordless drill with multiple bits handles most assembly tasks. Phillips head and Robertson bits cover IKEA’s standard fasteners.
Circular saw or miter saw cuts filler strips and panels to size. Hand saws work but increase labor time significantly.
Level ensures proper alignment during installation. Both 2-foot and 4-foot versions prove useful.
Hand Tools and Measuring Equipment
Measuring tools include tape measure, square, and pencil for marking. Accuracy here prevents costly mistakes later.
Screwdrivers provide backup when drill batteries die. Allen keys (hex wrenches) fit IKEA’s cam lock fasteners.
Clamps hold pieces during assembly. Bar clamps work best for large cabinet faces.
Safety Equipment and Workspace Setup
Safety equipment includes glasses and dust masks for cutting operations. First aid kit stays within reach.
Clear workspace prevents accidents. Kitchen islands require significant floor space during assembly.
Cardboard sheets protect flooring from scratches. Moving blankets cushion cabinet faces during transport.
Pre-Assembly Preparation Steps
Unpacking and inventory checking comes first. Count all hardware against instruction sheets before starting.
Assembly instructions deserve careful reading. IKEA’s pictorial guides show critical details often missed in rushed builds.
Sort hardware into labeled containers. This prevents confusion during multi-cabinet assembly.
Workspace organization saves time later. Group similar components together with adequate working room.
Step-by-Step Assembly Process
Building Individual Cabinet Boxes
Start with cabinet frames, not doors or drawers. Cabinet box construction follows IKEA’s specific sequence for structural integrity.
Cam locks and dowels create strong joints when properly aligned. Dry-fit pieces before final tightening to check alignment.
Quality checks during assembly catch problems early. Measure diagonals to verify square construction.
Common Assembly Mistakes
Over-tightening cam locks strips threads and weakens joints. Snug fit without forcing prevents damage.
Mixing up left and right panels happens frequently. Double-check orientation before drilling holes.
Missing or backwards drawer slides create non-functional storage. Test fit slides before permanent installation.
Creating the Island Base Structure
Connecting multiple cabinets requires careful alignment. Use clamps to hold position while installing connector bolts.
Cabinet combination techniques vary by configuration. Side-by-side units need different hardware than stacked arrangements.
Structural support becomes critical with multiple units. Internal braces distribute weight loads effectively.
Installing Toe Kicks and Legs
Toe kick installation happens after cabinet positioning but before countertop mounting. These clips attach to cabinet legs for quick removal.
Cabinet leg adjustment levels the entire island. Start from highest point and work down to maintain stability.
Floor anchoring isn’t always necessary but prevents sliding. Toggle bolts work on most floor types.
Door and Drawer Installation
Cabinet door alignment requires patience and precision. Hinges adjust in three directions for perfect gaps.
Drawer slide mounting follows specific measurements. Mark locations carefully before drilling pilot holes.
Drawer front adjustment allows fine-tuning after installation. Loosen screws slightly to shift position.
Hardware Installation
Cabinet hardware installation includes handles, knobs, and any decorative elements. Consistent spacing creates professional appearance.
Templates ensure uniform handle placement. Cardboard jigs speed installation on multiple doors.
Final hardware tightening prevents loosening over time. Check all connections monthly during first year.
Testing and Functionality Checks
Door and drawer operation should feel smooth without binding. Adjust hinges and slides as needed for proper function.
Electrical system verification includes testing all outlets and switches. GFCI protection may be required by local codes.
Stability and safety inspection confirms secure attachment and proper weight distribution. Address any wobbling immediately.
Load testing with typical kitchen items ensures adequate support. Gradually add weight while monitoring for deflection.
Installation and Positioning
Moving and Positioning the Island
Kitchen island assembly creates heavy, awkward units requiring careful handling. Two people minimum for safe transport.
Use moving straps or dollies for assembled cabinets. Protect floors with cardboard or moving blankets during positioning.
Floor marking helps establish exact placement before moving heavy components. Painter’s tape outlines the final position clearly.
Measuring Kitchen Workspace Clearance
Kitchen workflow optimization requires specific clearance measurements around your island. Minimum 36 inches on all sides prevents crowding.
Working triangles between sink, stove, and refrigerator shouldn’t exceed 26 feet total. Islands can disrupt efficient movement patterns.
Kitchen island dimensions affect traffic flow significantly. Measure twice, position once.
Final Positioning and Alignment
Island positioning guidelines start with the longest wall as reference. Square cabinets to this baseline for professional appearance.
Kitchen island anchoring prevents movement during use. Heavy countertops provide some stability naturally.
Use shims under cabinet legs for micro-adjustments. Small gaps disappear with proper leveling technique.
Securing and Leveling Methods
Kitchen island leveling begins with the highest corner. Adjust remaining legs to match this reference point.
Floor anchors work through toe kick openings into subflooring. Toggle bolts handle most residential applications effectively.
Kitchen island stability improves with proper weight distribution. Center heavy items over cabinet frames.
Electrical and Plumbing Connections
Kitchen electrical planning includes outlet placement and circuit requirements. GFCI protection may be mandatory.
Electrical outlets need rough-in boxes before countertop installation. Plan locations early in the process.
Under-cabinet lighting adds task illumination and ambiance. LED strips offer energy efficiency and long life.
Kitchen plumbing considerations require professional evaluation. Drain slopes and vent requirements vary by location.
Plumbing connections for kitchen sinks need proper trap installation and adequate drainage capacity.
Countertop Installation and Finishing
Measuring and Template Creation
Island countertop installation demands precise measurements. Mistakes here prove costly to correct.
Countertop overhang measurements determine seating capacity. Standard 10-12 inches accommodates most bar stools comfortably.
Create cardboard templates for complex shapes. This prevents expensive material waste from cutting errors.
IKEA Countertop Options
KARLBY countertops offer solid wood appearance with affordable pricing. These require careful sealing against moisture damage.
HAMMARP countertops provide genuine hardwood surfaces. Regular maintenance preserves their natural beauty.
Laminate options like EKBACKEN resist stains and scratches. These work well in busy family kitchens.
Third-Party Countertop Considerations
Quartz and granite require professional templates and installation. Factor these costs into your budget planning early.
Seam placement affects both appearance and structural integrity. Minimize seams over kitchen storage solutions areas.
Support requirements increase with heavier materials. Reinforcement may be needed for large overhangs.
Edge Finishing and Details
Countertop installation process includes edge treatment selection. Rounded edges improve safety around seating areas.
Trimming and sanding techniques smooth rough cuts and joins. Start with coarse grits, finish with fine.
Edge banding conceals plywood cores on cut edges. Heat activation creates strong, lasting bonds.
Sealing and Protection Methods
Sealing and protection prevents moisture damage in wood countertops. Multiple thin coats work better than single thick applications.
Food-safe finishes are required for food preparation surfaces. Check manufacturer specifications carefully.
Annual resealing maintains protection and appearance. Light sanding between coats improves adhesion.
Cutout Planning for Appliances
Kitchen appliance integration requires precise cutout measurements. Templates from manufacturers ensure proper fit.
Kitchen island ventilation needs consideration for cooktop installations. Range hoods require adequate clearances.
Electrical rough-ins must align with appliance requirements. Coordinate these before countertop cutting.
Final Assembly and Quality Control
Door and Drawer Adjustments
Cabinet door alignment fine-tunes gaps and reveals. IKEA hinges adjust in three directions for perfect fit.
Drawer slide installation requires precise measurements and level mounting. Test operation before final tightening.
Drawer front positioning allows adjustment after installation. Loosen screws slightly to shift alignment.
Hardware and Accessory Installation
Cabinet organizers maximize kitchen storage solutions efficiency. Install these after doors and drawers function properly.
Cabinet accessories like soft-close mechanisms improve user experience. Retrofit kits work with most IKEA hardware.
Hardware installation includes handles, knobs, and decorative elements. Consistent spacing creates professional results.
Final Details and Finishing Touches
Interior cabinet lighting adds functionality and ambiance. Battery-powered LED strips avoid electrical complications.
Decorative panels hide exposed cabinet sides for finished appearance. These attach with screws or mounting clips.
Cabinet hardware should operate smoothly without binding. Lubricate moving parts if needed.
Testing and Functionality Checks
Door and drawer operation testing ensures smooth function under load. Add typical kitchen items gradually during testing.
Electrical system verification includes all outlets, switches, and lighting circuits. GFCI outlets should trip and reset properly.
Check all cabinet internal organizers for proper installation and smooth operation. Drawers should extend fully without binding.
Load Testing and Safety
Kitchen island storage capacity depends on cabinet construction and mounting quality. Distribute weight evenly across frames.
Stability and safety inspection confirms secure attachment points. Address any movement or wobbling immediately.
Test seating areas with actual weight loads. Bar stools should feel secure without island movement.
Final Quality Checks
Gap consistency checks ensure professional appearance between doors and drawer fronts. Adjust hinges and slides as needed.
Handle alignment should follow consistent spacing patterns. Use templates for uniform placement across multiple doors.
All fasteners deserve final tightening checks. Vibration during transport can loosen connections.
Kitchen island assembly completion includes cleanup and organization. Remove all packaging and debris before first use.
Store extra hardware and assembly instructions for future reference. These prove valuable for adjustments or repairs.
Troubleshooting Common Issues
Alignment and Fit Problems
Cabinet door alignment issues plague most DIY builders at some point. Doors hanging crooked or with uneven gaps need hinge adjustments.
Out-of-square cabinet boxes cause multiple problems downstream. Check diagonal measurements early to catch this issue.
Uneven reveals between doors signal alignment problems. Most IKEA hinges adjust in three directions for corrections.
Fixing Uneven Cabinet Connections
Cabinet combination techniques sometimes result in visible gaps between units. Connector bolts may need retightening or repositioning.
Shims between cabinets correct minor misalignments. Place these strategically to avoid visible gaps in door reveals.
Structural support becomes critical when cabinets don’t align naturally. Internal braces distribute loads more evenly.
Gap Adjustment Techniques
Gap consistency problems often stem from installation errors rather than manufacturing defects. Door and drawer fronts adjust independently.
Consistent 3mm gaps between doors create professional appearance. Use spacers during installation for uniform results.
Drawer front adjustment allows fine-tuning after initial installation. Loosen mounting screws slightly for repositioning.
Hardware and Mechanical Issues
Drawer slide problems usually involve improper mounting or overloading. Weight limits exist for standard IKEA hardware.
Soft-close hinges may stop working if debris accumulates in mechanisms. Regular cleaning prevents most failures.
Binding drawers often result from overloading or misaligned slides. Check weight distribution and slide positioning.
Hinge Adjustment Difficulties
Cabinet door installation requires understanding IKEA’s three-way hinge adjustment system. Height, depth, and side-to-side corrections are possible.
Doors that won’t close properly need gap adjustments first. Then fine-tune alignment for smooth operation.
Cabinet hardware loosens over time with regular use. Monthly checks prevent major alignment problems.
Handle and Knob Issues
Handle placement errors become obvious only after installation. Consistent spacing matters more than exact measurements.
Loose handles result from inadequate screw engagement. Longer screws or thread-locking compound solve most problems.
Handles and knobs should feel solid without wobbling. Tighten mounting hardware regularly during first year.
Structural and Stability Concerns
Kitchen island stability problems usually indicate inadequate floor attachment or overloading. Heavy items belong over cabinet frames.
Wobbling or movement during use suggests loose connections or uneven flooring. Address immediately for safety.
Cabinet legs may need readjustment as floors settle. Check level quarterly during first year of use.
Addressing Structural Problems
Floor attachment prevents movement but requires proper fastener selection. Toggle bolts work well through cabinet toe kicks.
Reinforcing weak connections involves adding internal braces or upgrading fasteners. Don’t ignore stability issues.
Weight distribution affects overall stability significantly. Store heavy items in lower cabinets when possible.
Floor Attachment Improvements
Kitchen island anchoring methods vary by floor type. Concrete requires different fasteners than wood subflooring.
Multiple attachment points distribute loads better than single central anchors. Space these evenly along cabinet bases.
Cabinet legs provide primary support while anchors prevent sliding. Both systems work together for stability.
Maintenance and Care Instructions
Regular Cleaning and Upkeep
Cabinet surface cleaning requires appropriate products for different finishes. Harsh chemicals damage some IKEA surfaces permanently.
Wood countertops need different care than laminate surfaces. Follow manufacturer recommendations for cleaning products.
Kitchen storage solutions benefit from regular organization and cleaning. Remove items periodically for thorough cabinet cleaning.
Daily Maintenance Tasks
Wipe spills immediately to prevent staining or damage. Water rings on wood surfaces require quick attention.
Interior organizers accumulate debris over time. Monthly cleaning maintains smooth operation and prevents odors.
Check door and drawer operation daily during first month. Early problems are easier to correct than chronic issues.
Weekly Care Routines
Hardware maintenance includes checking handle tightness and hinge operation. Loose hardware affects both function and appearance.
Clean cabinet doors with microfiber cloths and appropriate cleaners. Avoid abrasive materials that scratch surfaces.
Vacuum or sweep beneath island regularly. Debris accumulation affects cabinet leg stability and cleanliness.
Monthly Inspection Tasks
Door and drawer alignment deserves monthly attention during first year. Small adjustments prevent major problems later.
Check electrical connections and outlet function. GFCI outlets should test and reset properly.
Cabinet internal organizers may need adjustment as contents change. Ensure smooth operation of all moving parts.
Long-term Maintenance Requirements
Countertop care varies significantly by material type. Wood surfaces need periodic resealing while laminate requires only cleaning.
Cabinet hardware may need replacement after several years of heavy use. Keep spare parts inventory for quick repairs.
Drawer slide lubrication extends component life and maintains smooth operation. Use appropriate lubricants only.
Finish Touch-up Procedures
Cabinet door scratches and dings happen in busy kitchens. Touch-up markers and wood fillers handle minor damage.
Kitchen cabinet finishes may fade or wear in high-traffic areas. Plan for periodic refinishing of heavily used surfaces.
Countertop scratches require different repair methods depending on material. Some damage needs professional restoration.
Hardware Replacement Schedules
Soft-close hinges typically last 5-7 years with regular use. Replace when mechanism fails or becomes noisy.
Drawer slides may need replacement sooner if overloaded regularly. Quality varies significantly between IKEA series.
Handles and knobs rarely wear out but styles change. Keep original hardware for potential resale value.
Seasonal Maintenance Tasks
Kitchen electrical systems need annual inspection. Check under-cabinet lighting connections and replace bulbs as needed.
Wood expansion and contraction affects door alignment seasonally. Minor hinge adjustments may be needed.
Cabinet leg stability can change with seasonal floor movement. Recheck level annually and adjust as needed.
Professional Service Recommendations
Electrical connections require professional attention if problems persist. Don’t attempt repairs beyond your skill level.
Plumbing connections for kitchen sinks need professional maintenance. Leaks can damage cabinet interiors quickly.
Complex cabinet door alignment problems may need professional adjustment. Some issues exceed DIY repair capabilities.
Long-term Upgrade Considerations
Cabinet accessories and organizers improve with technology. Newer products often fit existing IKEA systems.
Countertop replacement becomes feasible after 10-15 years. Plan for this major update in advance.
Kitchen island modifications are possible with IKEA’s modular system. Additional cabinets or features can be integrated later.
FAQ on How To Make A Kitchen Island With Ikea Cabinets
What IKEA cabinet series works best for kitchen islands?
SEKTION base cabinets provide the ideal foundation for DIY kitchen islands. These modular units offer consistent dimensions, adjustable legs, and reliable hardware compatibility.
Standard 24-inch depth cabinets work well for most kitchen island dimensions while maintaining proper workspace clearance around your island.
How much does an IKEA kitchen island cost to build?
Budget planning for IKEA islands typically ranges $300-$1,200 depending on size and finishes. Base cabinets cost $80-$200 each, while countertops add $100-$400. Cabinet hardware, handles, and accessories contribute another $50-$150 to your total project cost.
What tools do I need for kitchen island assembly?
Power tools include a cordless drill, circular saw, and level for professional results. Hand tools like screwdrivers, clamps, and measuring tape handle detail work. Safety equipment including glasses and dust masks protect during cutting operations and assembly processes.
How do I connect multiple IKEA cabinets together?
Cabinet combination techniques use connector bolts and internal brackets for secure joining. Align cabinets carefully with clamps before drilling connector holes. Structural support improves with internal braces spanning multiple units, creating one solid island base structure.
What countertop options work with IKEA cabinet islands?
IKEA countertops like KARLBY and HAMMARP fit perfectly with standard cabinet widths. Third-party materials including quartz and granite require professional templates. Countertop overhang for seating needs proper support brackets beyond 8 inches of extension.
How do I level an uneven kitchen island?
Kitchen island leveling starts with adjustable IKEA cabinet legs ranging 4.5-6 inches. Find the highest corner first, then adjust remaining legs to match. Use shims for micro-adjustments and check with a level frequently during the process.
Can I add electrical outlets to my IKEA island?
Kitchen electrical planning requires rough-in boxes before countertop installation. Electrical outlets need GFCI protection in most areas. Plan outlet locations early and consider under-cabinet lighting for improved task illumination and ambient lighting effects.
How much clearance do I need around a kitchen island?
Kitchen workflow optimization requires minimum 36-inch clearance on all working sides. Kitchen island dimensions affect traffic flow significantly. Measure your space carefully, considering door swings and appliance locations for optimal movement patterns around your new island.
What’s the best way to attach an island to the floor?
Kitchen island anchoring prevents movement during use. Floor anchors work through toe kick openings into subflooring using toggle bolts. Heavy countertops provide natural stability, but proper anchoring ensures safety during food preparation and daily use.
How do I fix cabinet doors that won’t align properly?
Cabinet door alignment problems usually need hinge adjustments in three directions. Door and drawer operation improves with proper gap consistency of 3mm between doors. Cabinet hardware may need tightening or replacement if alignment issues persist despite adjustments.
Conclusion
Learning how to make a kitchen island with IKEA cabinets opens doors to affordable kitchen transformation. This DIY project delivers professional results without the premium price tag of custom installations.
Your new island becomes more than just additional workspace. It creates a focal point for family gatherings while maximizing kitchen functionality through smart space planning and organization.
Cabinet assembly skills transfer to future home improvement projects. The modular SEKTION system adapts to changing needs, allowing modifications and expansions over time.
Proper kitchen island installation requires patience and precision. Take time with measurements, alignment, and hardware adjustments for lasting satisfaction with your finished project.
The interior design flexibility of IKEA components matches any style preference. From modern minimalist interior to rustic kitchen design aesthetics, your island reflects personal taste while serving practical daily needs.
Most importantly, you’ve gained confidence in DIY kitchen renovation techniques. These skills serve you well for future kitchen updates and modifications.
More Kitchen Guides
- Kitchen island with seating on two sides
- Kitchen island with a wine fridge
- How to decorate a large kitchen island
- Kitchen cabinet crown molding ideas
- All kitchen color schemes by cabinet color

- Kitchen Color Schemes by Cabinet Color: What Pairs Well - October 19, 2026
- Curtain Colors for Every Wall Color: Safe vs Bold Picks - October 18, 2026
- Interior Design Styles: Find Your Primary and Secondary - October 14, 2026


